Chembond™
ChemBond™ Putty Mixing Instructions
ATS ChemBond™ Putty – for interior of Slip Collar and Slip Collar Flange Joints
The ChemBond™ Putty is used to bond the exterior of the joints. It is catalyzed using Standard Hardener. This section addresses the use of ChemBond™ Putty with Hardener. Putty mix is used to connect H-Collar and Saddle Tap Joints and other applications.
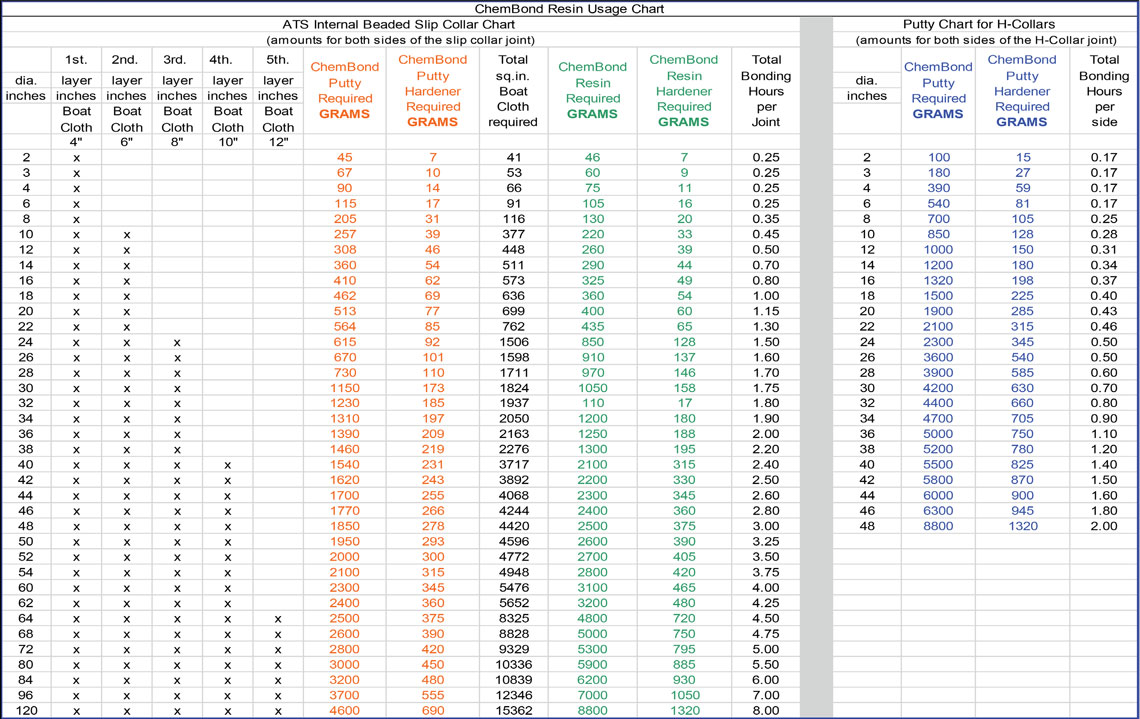
The ratio of ChemBond™ Hardener is 15% by weight of the Putty (for 100 grams of ChemBond™ Putty use 15 grams of Hardener). Proper ratios of Putty and hardener and thorough mixing of the Putty are crucial to proper cure, chemical resistance and strength of the joint. Do not “Eyeball” quantities. Be sure to mix until Putty and hardener are mixed together uniformly and then continue to mix for 2-3 minutes more. Refer to the “ChemBond™ Putty Chart” below for common size batches.
DO NOT ALTER THE PUTTY RATIO! 15% BY WEIGHT HARDENER TO PUTTY!
The curing cycle can only be accelerated by applying heat to the surface of the lay-up. A Hot-air gun works well to expedite the cure. If the Putty is not curing at a satisfactory rate, please contact ATS’ Engineering & Sales office at +1 (510) 234-3173.
Volumetric: For using volumetric mixes, we recommend standardizing on a batch mix that works best for your given project. For example; place a container that you will repeatedly use on a scale and zero the scale. Then, add ChemBond™ Putty into the container to the weight desired and mark the outside of the container at the Putty level. Next, repeat the process for the Hardener in a smaller clear jar. Be sure the Hardener is 15% the weight of the ChemBond Putty and mark the outside of the container at the level of Hardener. Pour the Putty and Hardener into a mixing container (scraping the sides of the measuring containers to remove all content); keep the marked containers for measuring, only. For all remaining batches, simply pour the Putty & Hardener into their respective containers to the marked line and transfer to the mixing container.
ChemBond™ Putty Mixing Chart
1 gallon container of ChemBond™ Putty = net 4.5 kg (10 lbs)
1 Pint container of ChemBond™ Hardener = net 0.675 kg (1.5 lbs)
Installation Instructions – Mixing Instructions, ChemBond™ Putty
(Note: Do not confuse “1 gallon container” with “1 fluid gallon.” The gallon container only holds 10 pounds of Putty/putty. It is not one full fluid gallon.)
| Weight Ratios (Metric) | |
|---|---|
| ChemBond Putty | Hardener |
| Grams | Grams |
| 100 | 15 |
| 200 | 30 |
| 400 | 60 |
| 500 | 75 |
| 1000 | 150 |
| Weight Ratios (Imperial) | |
|---|---|
| ChemBond Putty | Hardener |
| Pounds | Ounces |
| 1 | 2.5 |
| 2 | 5 |
| 3 | 7.5 |
| 4 | 10 |
| 5 | 12.5 |
ChemBond™ Resin Mixing Instructions
ATS ChemBond™ Resin – for exterior of Slip Collar and Slip Collar Flange Joints
The ChemBond™ Resin is used to bond the exterior of the joints. It is catalyzed using Standard Hardener. This section addresses the use of ChemBond™ Resin with Hardener.
The ratio of ChemBond™ Hardener is 15% by weight of the Resin (for 100 grams of ChemBond™ Resin use 15 grams of Hardener). Proper ratios of resin and hardener and thorough mixing of the resin are crucial to proper cure, chemical resistance and strength of the joint. Do not “Eyeball” quantities. Be sure to mix until resin and hardener are mixed together uniformly and then continue to mix for 2-3 minutes more. Refer to the “ChemBond™ Resin Chart” below for common size batches.
DO NOT ALTER THE RESIN RATIO! 15% BY WEIGHT HARDENER TO RESIN!
The curing cycle can only be accelerated by applying heat to the surface of the lay-up. A Hot-air gun works well to expedite the cure. If the resin is not curing at a satisfactory rate, please contact ATS’ Engineering & Sales office at +1 (510) 234-3173.
Volumetric: For using volumetric mixes, we recommend standardizing on a batch mix that works best for your given project. For example; place a container that you will repeatedly use on a scale and zero the scale. Then, add ChemBond™ Resin into the container to the weight desired and mark the outside of the container at the Resin level. Next, repeat the process for the Hardener in a smaller clear jar. Be sure the Hardener is 15% the weight of the ChemBond Resin and mark the outside of the container at the level of Hardener. Pour the Resin and Hardener into a mixing container (scraping the sides of the measuring containers to remove all content); keep the marked containers for measuring, only. For all remaining batches, simply pour the Resin and Hardener into their respective containers to the marked line and transfer to the mixing container.
ChemBond™ Resin Mixing Chart
1 gallon container of ChemBond™ Resin = net 4.5 kg (10 lbs)
1 Pint container of ChemBond™ Hardener = net 0.675 kg (1.5 lbs)
Installation Instructions – Mixing Instructions, ChemBond™ Resin
(Note: Do not confuse “1 gallon container” with “1 fluid gallon.” The gallon container only
| Weight Ratios (Metric) | |
|---|---|
| ChemBond Resin | Hardener |
| Grams | Grams |
| 100 | 15 |
| 200 | 30 |
| 400 | 60 |
| 500 | 75 |
| 1000 | 150 |
| Weight Ratios (Imperial) | |
|---|---|
| ChemBond Resin | Hardener |
| Pounds | Ounces |
| 1 | 2.5 |
| 2 | 5 |
| 3 | 7.5 |
| 4 | 10 |
| 5 | 12.5 |
ChemBond™ Joint Chart
ATS ChemBond™ Cure Times
ATS ChemBond™ putty and ATS ChemBond™ resin combine superior chemical resistance and high structural strength with low flame and smoke characteristics. The ChemBond™ resin with glass reinforcement is used to bond two adjoining pieces of ATS FXP™ duct without pre-sanding the duct surface.
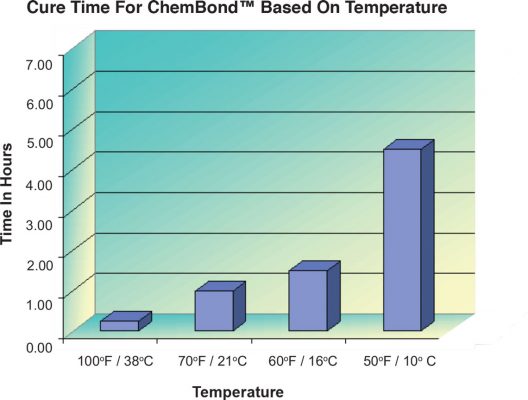
Unlike other resin systems, ATS ChemBond™ cure time is not dependent upon the ratio of hardener. ATS ChemBond™ must be mixed in the proper ratio no matter what the temperature is. To affect the cure time, the temperature of the putty/resin itself needs to be adjusted. To shorten cure time, the putty/resin should be heated, and to lengthen cure time, the putty/resin should be cooled.
The ATS ChemBond™ putty/resin is designed to cure optimally at 75°F (24°C). At this temperature, its pot life is approximately 45 minutes. ATS ChemBond™ will cure at lower temperatures, down to 40°F (4°C). However, do not allow the putty/resin to freeze. ATS ChemBond™ that has frozen is no longer usable.
Two different methods of controlling putty/resin cure times are available:
- A container of ATS ChemBond™ can be placed in a water bath to either warm or cool to a desired temperature decreasing or increasing the cure time accordingly. Ensure the water does not come in contact with the putty/resin.
- A heat gun can be used to warm the area that will be bonded decreasing cure time.
The chart below can be used as a guide to ATS ChemBond™ cure times at various temperatures. The times may vary dependent upon field conditions.
Wet Bench Hook-up Preparing Cut Edges
ATS recommends resin coating the edges of all duct and fittings prior to installation when hooking up to wet-etch tools. Resin coating the raw cut edges of the duct will give added corrosion resistance protection to the field joint, especially to “Hot Sulfuric Acid” and related aggressive oxidizing reagents. The illustration of coating the edges below:
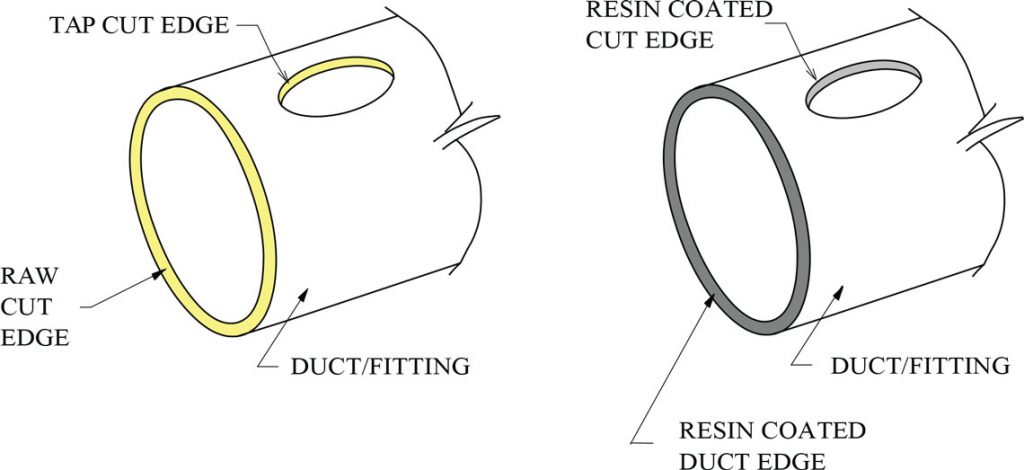
Resin Coating Steps
IMPORTANT NOTE: For the purposes of coating the cut edges of the duct, use ATS ChemBond™ Resin with Resin Hardener at a ratio of 15% Hardener to the weight of the resin.
- Mix a small batch of ATS ChemBond™ Resin and Resin Hardener to the ratios noted above.
- Using a brush or roller, apply resin mix to the cut edges of the duct or fitting.
- Be sure to cover the edges thoroughly. Be sure all raw glass and dry fibers are covered. (Alternatively, Ashland 510A Vinyl Ester Resin can be used.)
Joining Dissimilar Materials to ATS FXP™ with ChemBond™
ATS ChemBond™ can be used to bond ATS FXP™ duct to itself or to other types of plastic or metal ductwork. The most common plastic ducts are conventional polyester and vinyl ester fiberglass reinforced plastic (FRP), polyvinyl chloride (PVC) and polypropylene (PP). Metal ducts are either usually made of stainless steel (SS) or galvanized steel (GS). Below are the methods that we recommend to achieve both a chemical and/or mechanical bond to these materials. Refer to the ATS installation guide for the recommended glass widths, the number of glass reinforcement layers and the correct methods for handling and using ATS ChemBond™ resin.
Note: For butt joint connections, ATS can manufacture H-Collars with one end made special to fit the I.D. and O.D. dimensions to accept the non-ATS duct. (See H-Collar Installation Instructions, page 141.) Before making the connection, follow the preparation procedures for the non-ATS duct as described in the paragraphs below.
Non-FM Regular FRP
Non-FM Regular FRP duct typically is supplied with an exterior surface that has a slick gel coat finish or an intumescent (fire-protective) coating. These exterior finishes must be removed by lightly sanding the surface to expose the inner glass fibers of the duct structure prior to the application of the ATS ChemBond™ resin and the glass reinforcement materials. After the area to be bonded has been sanded, the surface must be cleaned with a solvent-based agent to remove the surface dust and any wax added to the exterior resin for curing purposes.
PVC
Although ATS ChemBond™ resin will bond ATS FXP™ duct directly to PVC, it requires sanding to achieve a good bond. A simple solution is flange to flange.
PP (Polypropylene) and PPs (Polypropylene “Schwerentflammbar”)
The exterior surface of the PP must be carefully heated with a high wattage heat gun or a propane torch. Only apply enough heat to change the shiny surface of the PP to a dull, discolored texture. A test to measure the appropriate amount of heat is to heat until the endpoint of a paper clip can be thrust into the surface approximately 0.020 in. (0.5 mm). Be careful not to melt and deform the plastic structure. The surface is prepared properly when water “sheets off” evenly on the PP surface (instead of beading). At this point, the ion structure of the surface has changed and the ATS ChemBond™ resin will bond to the PP surface. Coarse-grit sanding will increase the mechanical bond strength.
Stainless Steel & Galvanized Metal
The outer surface of the metal must be cleaned with a solvent agent to remove protective oils and foreign particles. The surface of the metal should then be coarsely sanded before applying ATS ChemBond™.
For more detailed information, please contact the ATS Products’ Engineering Department at +1-510-234-3173.
Please contact ATS’ Engineering department with questions regarding resin coating duct edges.